In this environment, we used another enterprise disk array (no vendor names mentioned) that was aging, and we were continuing to pay large amounts of money on for maintenance... for a relatively small amount of storage space. We wanted to replace this expensive, proprietary disk array with something else.
We had been using ESOS for a while, and liked it. Recently, a number of new features were added to ESOS, including DRBD, Pacemaker + Corosync, LVM2, and other software packages and enhancements. This opened up the possibility of creating a highly available disk array using ESOS.
The Setup
At the time of building the new ESOS-based disk array, our disk space need was only 5 TB, so we wanted to make sure our new unit gave us room to grow. Since there doesn’t appear to be any local RAID controllers that have a high availability option, and/or support for sharing external JBODs, or something similar, our only option was to mirror the entire disk array to another unit. With this setup, we configured two servers in a cluster, with each containing its own local disks, RAID controller, and Fibre Channel HBA. The data between the two nodes is replicated using DRBD, and then each ESOS node is on the SAN, and the initiators use each target node as a path. We make use of implicit Asymmetric Logical Unit Access (ALUA) in SCST, to help control, or rather guide/recommend (depending on the initiators) which path to use, and we only want the initiators to use a single path/target (unless there is a failover), since there is more to SCSI than just reading/writing blocks of data. Only the blocks are replicated via DRBD in this ESOS disk array cluster; things like SCSI reservations are not replicated between the cluster nodes, so its important the initiators don’t round-robin between paths, and for clusters of initiators, they should all use the same target/path.
For this new disk array we designed, performance was not a big factor to consider -- we already had a ton of SSD-backed storage in our environment (SAN) on the other ESOS disk arrays. This new unit would primarily be used for VMware ESXi boot volumes, and a couple large general purpose VMFS volumes (for parent VMs, supporting server VMs, etc.). We decided on the LSI Logic Nytro MegaRAID application acceleration card, a relatively new product to the LSI line-up. This particular card features built-in (on card) SSD storage which allows data “hot spots” to be promoted onto the SSD storage, and it also sports 1 GB of cache. LSI Logic MegaRAID cards work well with ESOS since the text-based user interface (TUI) has basic support for configuring logical drives on these controllers.
For the replication link between the two systems, we initially planned on using InfiniBand HCAs with Sockets Direct Protocol (SDP) which utilizes Remote Direct Memory Access (RDMA), but unfortunately, since SDP is now deprecated, it is not supported by ESOS. So, we went ahead with two InfiniBand HCAs with a QDR cable between the two nodes, and used IP over InfiniBand (IPoIB).
Each node has (12) 3.5” SAS disk slots; we used 7,200 RPM 2 TB SAS drives (Seagate). We will dedicate (1) drive to a global hot spare, and will then create one (6) disk RAID5 volume, and one (5) disk RAID5 volume. This gives us approximately 16 TB of usable space (after RAID parity) which is quite a bit more than what we currently have.
We now had a plan for our new fully redundant, Fibre Channel disk array, based on Enterprise Storage OS (ESOS). We got down to business, and put in requisitions for all of the new hardware.
Cost breakdown for the new ESOS disk array:
- ~ $1,100 - (2) Mellanox MHQH19B-XTR ConnectX 2 VPI InfiniBand HCAs
- ~ $50 - (1) Mellanox Technologies Half M Copper 4x QSFP 30 AWG Cable
- ~ $3,000 - (2) LSI Logic LSI00350 Nytro MegaRAID 8100-4I SAS RAID Controllers
- ~ $300 - (2) LSI Nytro MegaRAID SCM01 RAID Controller Cache Data Protection Modules
- ~ $6,400 - (26) Seagate Constellation ES.2 ST32000645SS 2 TB SAS-2 Hard Drives
- ~ $2,000 - (2) QLogic 8 Gb Fibre Channel PCI-E Single Port Host Bus Adapters
- ~ $8,100 - (2) Supermicro SuperStorage Server 6027R-E1R12T Chassis (12 x 3.5” Slots; 32 GB RAM; 2 x Intel Xeon Processors)
- ~ $100 - (2) Lexar JumpDrive Triton 32 GB USB 3.0 Flash Drives
Total cost for a ~16 TB, fully redundant, Fibre Channel disk array: ~ $21,050... replacing your enterprise disk array for less than a year’s worth of maintenance costs... priceless!


So, we’re using the InfiniBand link for DRBD replication, and then in our environment, we have a normal management network for servers/devices, and then we also have a special, non-routable private network that we use for out-of-band management interfaces (DRAC, IPMI, etc.). For these ESOS storage server nodes, we used the Supermicro out-of-band management interfaces on our private network, and then connected one of the NICs on each node to this network. This connectivity is important since we use IPMI as our fencing/STONITH method later in the article. We make use of the other server NIC on our primary management network. The two networks are completely separate/independent, which is important since we use two rings with Corosync, one for each network; if one network/link goes down, the two nodes can still communicate with each other. Then each ESOS node is connected to an independent Fibre Channel (FC) fabric, and each host/initiator is connected to both fabrics giving us full redundancy in case of a switch/fabric failure.

Installation
We spent a morning installing the servers in a rack and installing all of the components (RAID controller, HCA, HBA, etc.) in each unit. We then cabled everything, powered up each server, and installed the disks in the trays.
We started by configuring the out-of-band management interface on the SuperMicro servers. Once we got the default password changed, we opened the virtual console and set a few BIOS (UEFI) settings:
- We enabled the “mirroring” memory mode, giving us 16 GB of available memory.
- For the MegaRAID card, we disabled controller BIOS (not booting from any logical drives).
- We double-checked that the QLogic HBA BIOS option was set to disabled.
Next, we created (2) ESOS USB flash drives. For the USB drives, we decided to go with an above-average device, the Lexar JumpDrive Triton 32GB USB 3.0 flash drive. Even though our servers aren’t USB 3.0, these devices when run at USB 2.0 are much faster than ordinary/standard flash drives. This makes a noticeable difference in ESOS when booting since the entire image is copied into a tmpfs file system on start-up, and even when sync’ing configuration changes.
We used a RHEL (6) workstation as our system to create the ESOS USB flash drives. We then downloaded and extracted the latest installation package from the ESOS project page: http://code.google.com/p/enterprise-storage-os/
wget http://enterprise-storage-os.googlecode.com/files/esos-0.1-r469.tar.xz
tar xvfJ esos-0.1-r469.tar.xz
After the archive was extracted, we plugged in the first flash drive and found the device node using the lsscsi tool. We then started the ESOS installer script:
cd esos-0.1-r469
./install.sh
The installer will prompt for the USB flash drive device node, and warn you before writing the image to the disk. After the image was successfully written, the install script then prompted us to install a third-party (proprietary) CLI RAID configuration tool. In our case, we are using LSI Logic MegaRAID cards, so we downloaded MegaCLI from the given URL and placed it into the temporary directory. The installer finished incorporating the MegaCLI tool into the image and then it was ready for use!
We repeated the above ESOS installation steps for our second server (second USB flash drive). We then labeled each flash drive with the corresponding server’s host name and inserted the drives into each server.
Since we didn’t have any other boot devices on these systems, the ESOS USB flash drive defaulted to being the first boot device (we checked via the UEFI setup screen). We booted up each ESOS storage server, and the first thing we did on both was change the default password (root/esos).


System Configuration
Next, we configured our two Ethernet network interfaces and host name in the TUI. After the interfaces were configured, we SSH’d into the machines set the timezone, date/time and an NTP server.


Next we need to enable IP over InfiniBand (IPoIB) for our IB interfaces on each host. Ideally, Sockets Direct Protocol (SDP) would be the best for the replication with DRBD and InfiniBand, but SDP is now deprecated, and ESOS does not support it. There has been hints in forums of DRBD adding RDMA support (which IPoIB lacks), but until then, this is probably the best solution. 10 GbE would also be a good option, and truthfully, this IPoIB setup is probably only marginally better.
Edit the ‘/etc/infiniband/openib.conf’ IB driver configuration file, and set the following two lines (on both hosts):
IPOIB_LOAD=yes
SET_IPOIB_CM=yes
Next, we restarted the IB stack on each host:
/etc/rc.d/rc.openibd stop && /etc/rc.d/rc.openibd start
Now that IPoIB is loaded, we can configure the IB interfaces using the TUI. We just chose an arbitrary network range that we’re not using anywhere else on campus (even though this isn’t routable). We then started OpenSM on each storage server:
/etc/rc.d/rc.opensm start
The OpenSM InfiniBand subnet manager handles multiple instances and will make one of them enter “standby” mode. After starting the OpenSM service, we edited the ‘/etc/rc.conf’ file and set rc.opensm_enable to “YES” so it starts up on boot. We then tested the IPoIB interface by pinging the other host.
Next, we configured email (SMTP) on each ESOS storage server. ESOS makes use of email for communicating alerts, warnings, errors, etc. to the administrator, so its important to configure.
Initial Cluster Setup
Now that we have the basic system configuration out of the way for each host, we can move on to configuring the cluster. The first step in the cluster setup, will be Corosync. Here is the ‘/etc/corosync/corosync.conf’ file we used on both nodes:
# 20130410 MAS

totem {
        version: 2
        cluster_name: esos
        crypto_cipher: none
        crypto_hash: none
        rrp_mode: passive
       interface {
                ringnumber: 0
                bindnetaddr: 10.35.6.0
                mcastaddr: 226.94.1.1
                mcastport: 5405
                ttl: 1
        }
       interface {
                ringnumber: 1
                bindnetaddr: 172.16.106.0
                mcastaddr: 226.94.1.2
                mcastport: 5407
                ttl: 1
        }
}

nodelist {
        node {
                ring0_addr: 10.35.6.21
                nodeid: 1
        }
        node {
                ring0_addr: 10.35.6.22
                nodeid: 2
        }
}

logging {
        fileline: off
        to_stderr: no
        to_syslog: yes
        syslog_facility: local2
        debug: off
        timestamp: off
        logger_subsys {
                subsys: QUORUM
                debug: off
       }
}

quorum {
        provider: corosync_votequorum
        two_node: 1
}
In our configuration, we opted to use one ring on our primary Ethernet management interface (10.35.6.0) and one ring on our special non-routable management network (172.16.106.0). Next, we restarted Pacemaker and Corosync on each host, then checked the Corosync configuration:
/etc/rc.d/rc.corosync stop
/etc/rc.d/rc.pacemaker stop
/etc/rc.d/rc.corosync start
/etc/rc.d/rc.pacemaker start
corosync-cfgtool -s
Everything looks, good, we see two rings with no faults. Next, we checked the cluster configuration:
crm configure show
crm_mon -1
In our configuration, on each host we see an extra node in the config. That is left-over from the default cluster stack configuration (eg, “node $id="16777343" raisin.mcc.edu”) so we just used ‘crm configure edit’ and removed that line.
LVM / SCST ALUA Settings
Next, we made a few system configuration LVM changes to prepare for later steps; we want LVM to only discover devices on /dev/drbdX block devices and not the underlying device. We also set it so LVM doesn’t cache, set the default locking type to 3 (built-in cluster wide locking), and removed the current cache file (on each host):
Edited the ‘/etc/lvm/lvm.conf’ and set/ran the following:
- filter = [ "a|drbd.*|", "r|.*|" ]
- write_cache_state = 0
- locking_type = 3
- rm -f /etc/lvm/cache/.cache
- mount /mnt/conf && rm -f /mnt/conf/etc/lvm/cache/.cache && umount /mnt/conf
Since SCST is already running (default) we went ahead and added our base ALUA settings to each host. We create a device group, which all SCST devices will be added to, and then a “local” and “remote” target group on each host. The “local” target group on each host contains the single, local Fibre Channel target. Then on the “remote” target group, we add the FC target of the other host. This setup is required for the SCST resource agent (Master/Slave -> ALUA).
On host cantaloupe.mcc.edu:
scstadmin -add_dgrp esos
scstadmin -add_tgrp local -dev_group esos
scstadmin -set_tgrp_attr local -dev_group esos -attributes group_id=1
scstadmin -add_tgrp_tgt 50:01:43:80:21:df:9b:4c -dev_group esos -tgt_group local
scstadmin -set_tgt_attr 50:01:43:80:21:df:9b:4c -driver qla2x00t -attributes rel_tgt_id=1
scstadmin -add_tgrp remote -dev_group esos
scstadmin -set_tgrp_attr remote -dev_group esos -attributes group_id=2
scstadmin -add_tgrp_tgt 50:01:43:80:21:df:c7:f4 -dev_group esos -tgt_group remote
scstadmin -set_ttgt_attr 50:01:43:80:21:df:c7:f4 -dev_group esos -tgt_group remote \
-attributes rel_tgt_id=2
On host raisin.mcc.edu:
scstadmin -add_dgrp esos
scstadmin -add_tgrp local -dev_group esos
scstadmin -set_tgrp_attr local -dev_group esos -attributes group_id=2
scstadmin -add_tgrp_tgt 50:01:43:80:21:df:c7:f4 -dev_group esos -tgt_group local
scstadmin -set_tgt_attr 50:01:43:80:21:df:c7:f4 -driver qla2x00t -attributes rel_tgt_id=2
scstadmin -add_tgrp remote -dev_group esos
scstadmin -set_tgrp_attr remote -dev_group esos -attributes group_id=1
scstadmin -add_tgrp_tgt 50:01:43:80:21:df:9b:4c -dev_group esos -tgt_group remote
scstadmin -set_ttgt_attr 50:01:43:80:21:df:9b:4c -dev_group esos -tgt_group remote \
-attributes rel_tgt_id=1
Additional System Setup / Back-End Storage Configuration
After ALUA was setup on each host, we exited the shell into the TUI and sync’d the configuration (System -> Sync. Configuration); this writes the current SCST configuration to a file and syncs everything with the USB flash drive. We could now configure the ESOS system services for our setup; edit the ‘/etc/rc.conf’ file and set the following (on both hosts):
rc.openibd_enable=YES
rc.opensm_enable=YES
rc.sshd_enable=YES
rc.lvm2_enable=NO
rc.drbd_enable=NO
rc.corosync_enable=YES
rc.dlm_enable=YES
rc.clvmd_enable=YES
rc.pacemaker_enable=YES
rc.mhvtl_enable=NO
rc.scst_enable=NO
The primary services/systems we use on these hosts (DRBD, LVM, and SCST) are all managed by the cluster stack, so we disable them from starting by the init/rc scripts. Since we will be using LVM on top of DRBD, we use clvmd which prevents (using locking) concurrent LVM metadata updates. DLM is a requirement for clvmd, so we enable that as well. Now we reboot both nodes to ensure everything starts up (or doesn't) as expected. Check the physical console for start-up errors/messages.
We wanted to be sure the LSI Logic Nytro MegaRAID (8100-4i) cards have the newest firmware available, so we downloaded the firmware image and flashed the controller on each host:
MegaCli64 -adpfwflash -f NytroMrFw.rom -a0
After the firmware image download was complete, we rebooted each node. We are now ready for creating our RAID logical drives (virtual drives). Since we are creating an exact replica of all the storage on each host, we’ll configure them the same. We have (12) SAS 2 TB hard drives in each box; we want (1) global hot spare drive, and then we decided on (2) RAID5 volumes (one with six disks, one with five disks). We felt this setup might give us more performance instead of making one large RAID5 volume with (11) disks, or a RAID6 volume. Since we are using a MegaRAID controller (LSI Logic) we were able to use the TUI to provision our back-end storage.

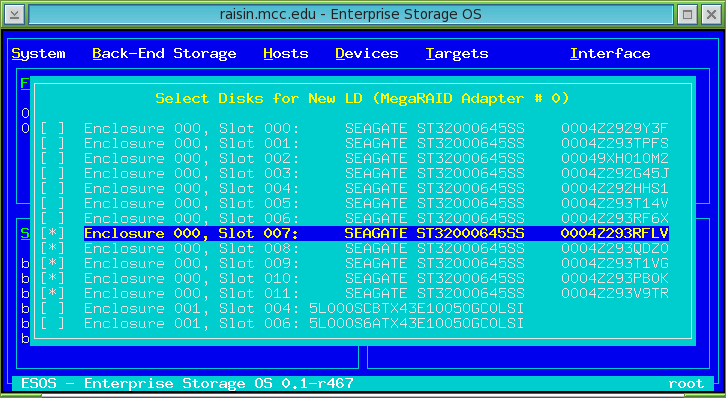
After we created our two RAID groups on each host, we needed to setup a global hot spare drive. The TUI in ESOS does not support this feature, we had to use the shell (Interface -> Exit to Shell):
MegaCli64 -pdhsp -set -physdrv[18:11] -a0
Back-End Storage Performance Testing
Before continuing our setup, we thought it would be fun to do a couple quick performance tests on the back-end storage. For these tests, we used the (6) disk RAID5 volume and used the included ‘fio’ tool in ESOS.
In this test, we are doing sequential reads with 4 MB blocks for 60 seconds:
fio --bs=4M --direct=1 --rw=read --ioengine=libaio --iodepth=64 --name=/dev/disk-by-id/LUN_NAA-600605b0054a751018f856b51625577a --runtime=60
--snip--
/dev/disk-by-id/LUN_NAA-600605b0054a751018f856b51625577a: (g=0): rw=read, bs=4M-4M/4M-4M/4M-4M, ioengine=libaio, iodepth=64
fio-2.0.13
Starting 1 process
Jobs: 1 (f=1): [R] [100.0% done] [352.0M/0K/0K /s] [88 /0 /0 iops] [eta 00m:00s]
/dev/disk-by-id/LUN_NAA-600605b0054a751018f856b51625577a: (groupid=0, jobs=1): err= 0: pid=3069: Wed Apr 10 13:49:37 2013
read : io=20728MB, bw=353222KB/s, iops=86 , runt= 60091msec
slat (usec): min=199 , max=48229 , avg=11580.02, stdev=12383.05
clat (msec): min=66 , max=2134 , avg=726.91, stdev=58.13
lat (msec): min=92 , max=2134 , avg=738.49, stdev=56.86
clat percentiles (msec):
| 1.00th=[ 635], 5.00th=[ 676], 10.00th=[ 693], 20.00th=[ 709],
| 30.00th=[ 717], 40.00th=[ 725], 50.00th=[ 734], 60.00th=[ 742],
| 70.00th=[ 742], 80.00th=[ 750], 90.00th=[ 766], 95.00th=[ 775],
| 99.00th=[ 791], 99.50th=[ 791], 99.90th=[ 799], 99.95th=[ 2114],
| 99.99th=[ 2147]
bw (KB/s) : min= 5885, max=414476, per=99.32%, avg=350819.86, stdev=35462.71
lat (msec) : 100=0.06%, 250=0.25%, 500=0.41%, 750=77.29%, 1000=21.94%
lat (msec) : >=2000=0.06%
cpu : usr=0.02%, sys=2.02%, ctx=2440, majf=0, minf=65561
IO depths : 1=0.1%, 2=0.1%, 4=0.1%, 8=0.2%, 16=0.3%, 32=0.6%, >=64=98.8%
submit : 0=0.0%, 4=100.0%, 8=0.0%, 16=0.0%, 32=0.0%, 64=0.0%, >=64=0.0%
complete : 0=0.0%, 4=100.0%, 8=0.0%, 16=0.0%, 32=0.0%, 64=0.1%, >=64=0.0%
issued : total=r=5182/w=0/d=0, short=r=0/w=0/d=0
Run status group 0 (all jobs):
READ: io=20728MB, aggrb=353222KB/s, minb=353222KB/s, maxb=353222KB/s, mint=60091msec, maxt=60091msec
--snip--
In this test, we are doing sequential writes with 4 MB blocks for 60 seconds:
fio --bs=4M --direct=1 --rw=write --ioengine=libaio --iodepth=64 --name=/dev/disk-by-id/LUN_NAA-600605b0054a751018f856b51625577a --runtime=60
--snip--
/dev/disk-by-id/LUN_NAA-600605b0054a751018f856b51625577a: (g=0): rw=write, bs=4M-4M/4M-4M/4M-4M, ioengine=libaio, iodepth=64
fio-2.0.13
Starting 1 process
Jobs: 1 (f=1): [W] [100.0% done] [0K/740.0M/0K /s] [0 /185 /0 iops] [eta 00m:00s]
/dev/disk-by-id/LUN_NAA-600605b0054a751018f856b51625577a: (groupid=0, jobs=1): err= 0: pid=3072: Wed Apr 10 14:12:14 2013
write: io=44996MB, bw=767254KB/s, iops=187 , runt= 60053msec
slat (usec): min=347 , max=40575 , avg=5330.42, stdev=4645.18
clat (msec): min=51 , max=395 , avg=336.13, stdev=34.02
lat (msec): min=52 , max=397 , avg=341.46, stdev=34.21
clat percentiles (msec):
| 1.00th=[ 74], 5.00th=[ 318], 10.00th=[ 322], 20.00th=[ 330],
| 30.00th=[ 334], 40.00th=[ 338], 50.00th=[ 338], 60.00th=[ 343],
| 70.00th=[ 347], 80.00th=[ 351], 90.00th=[ 359], 95.00th=[ 363],
| 99.00th=[ 371], 99.50th=[ 379], 99.90th=[ 388], 99.95th=[ 392],
| 99.99th=[ 396]
bw (KB/s) : min=692166, max=1378932, per=99.60%, avg=764193.58, stdev=62862.74
lat (msec) : 100=1.16%, 250=0.55%, 500=98.28%
cpu : usr=17.26%, sys=3.64%, ctx=5367, majf=0, minf=25
IO depths : 1=0.1%, 2=0.1%, 4=0.1%, 8=0.1%, 16=0.1%, 32=0.3%, >=64=99.4%
submit : 0=0.0%, 4=100.0%, 8=0.0%, 16=0.0%, 32=0.0%, 64=0.0%, >=64=0.0%
complete : 0=0.0%, 4=100.0%, 8=0.0%, 16=0.0%, 32=0.0%, 64=0.1%, >=64=0.0%
issued : total=r=0/w=11249/d=0, short=r=0/w=0/d=0
Run status group 0 (all jobs):
WRITE: io=44996MB, aggrb=767253KB/s, minb=767253KB/s, maxb=767253KB/s, mint=60053msec, maxt=60053msec
--snip--
In this test, we are doing random reads with 4 KB blocks for 60 seconds:
fio --bs=4k --direct=1 --rw=randread --ioengine=libaio --iodepth=64 --name=/dev/disk-by-id/LUN_NAA-600605b0054a751018f856b51625577a --runtime=60
--snip--
/dev/disk-by-id/LUN_NAA-600605b0054a751018f856b51625577a: (g=0): rw=randread, bs=4K-4K/4K-4K/4K-4K, ioengine=libaio, iodepth=64
fio-2.0.13
Starting 1 process
Jobs: 1 (f=1): [r] [100.0% done] [3128K/0K/0K /s] [782 /0 /0 iops] [eta 00m:00s]
/dev/disk-by-id/LUN_NAA-600605b0054a751018f856b51625577a: (groupid=0, jobs=1): err= 0: pid=3075: Wed Apr 10 14:14:06 2013
read : io=191372KB, bw=3181.2KB/s, iops=795 , runt= 60158msec
slat (usec): min=3 , max=49 , avg= 9.80, stdev= 3.59
clat (usec): min=90 , max=1504.8K, avg=80370.26, stdev=83326.84
lat (usec): min=107 , max=1504.8K, avg=80380.45, stdev=83326.84
clat percentiles (msec):
| 1.00th=[ 6], 5.00th=[ 9], 10.00th=[ 12], 20.00th=[ 20],
| 30.00th=[ 29], 40.00th=[ 41], 50.00th=[ 55], 60.00th=[ 72],
| 70.00th=[ 94], 80.00th=[ 126], 90.00th=[ 182], 95.00th=[ 241],
| 99.00th=[ 396], 99.50th=[ 469], 99.90th=[ 652], 99.95th=[ 750],
| 99.99th=[ 979]
bw (KB/s) : min= 2221, max= 3368, per=99.98%, avg=3180.32, stdev=119.15
lat (usec) : 100=0.01%, 250=0.04%, 500=0.01%, 750=0.01%
lat (msec) : 2=0.01%, 4=0.11%, 10=6.66%, 20=14.21%, 50=26.38%
lat (msec) : 100=24.76%, 250=23.31%, 500=4.13%, 750=0.33%, 1000=0.05%
lat (msec) : 2000=0.01%
cpu : usr=0.67%, sys=1.12%, ctx=46578, majf=0, minf=87
IO depths : 1=0.1%, 2=0.1%, 4=0.1%, 8=0.1%, 16=0.1%, 32=0.1%, >=64=99.9%
submit : 0=0.0%, 4=100.0%, 8=0.0%, 16=0.0%, 32=0.0%, 64=0.0%, >=64=0.0%
complete : 0=0.0%, 4=100.0%, 8=0.0%, 16=0.0%, 32=0.0%, 64=0.1%, >=64=0.0%
issued : total=r=47843/w=0/d=0, short=r=0/w=0/d=0
Run status group 0 (all jobs):
READ: io=191372KB, aggrb=3181KB/s, minb=3181KB/s, maxb=3181KB/s, mint=60158msec, maxt=60158msec
--snip--
In this test, we are doing random writes with 4 KB blocks for 60 seconds:
fio --bs=4k --direct=1 --rw=randwrite --ioengine=libaio --iodepth=64 --name=/dev/disk-by-id/LUN_NAA-600605b0054a751018f856b51625577a --runtime=60
--snip--
/dev/disk-by-id/LUN_NAA-600605b0054a751018f856b51625577a: (g=0): rw=randwrite, bs=4K-4K/4K-4K/4K-4K, ioengine=libaio, iodepth=64
fio-2.0.13
Starting 1 process
Jobs: 1 (f=1): [w] [100.0% done] [0K/1388K/0K /s] [0 /347 /0 iops] [eta 00m:00s]
/dev/disk-by-id/LUN_NAA-600605b0054a751018f856b51625577a: (groupid=0, jobs=1): err= 0: pid=3078: Wed Apr 10 14:15:29 2013
write: io=118572KB, bw=1969.2KB/s, iops=492 , runt= 60216msec
slat (usec): min=3 , max=40 , avg= 8.88, stdev= 4.42
clat (usec): min=392 , max=614423 , avg=129850.00, stdev=95972.42
lat (usec): min=403 , max=614434 , avg=129859.28, stdev=95974.97
clat percentiles (usec):
| 1.00th=[ 772], 5.00th=[ 828], 10.00th=[ 868], 20.00th=[ 1012],
| 30.00th=[ 1112], 40.00th=[162816], 50.00th=[177152], 60.00th=[185344],
| 70.00th=[193536], 80.00th=[201728], 90.00th=[214016], 95.00th=[226304],
| 99.00th=[288768], 99.50th=[350208], 99.90th=[585728], 99.95th=[593920],
| 99.99th=[610304]
bw (KB/s) : min= 691, max=78858, per=100.00%, avg=1976.98, stdev=7108.54
lat (usec) : 500=0.06%, 750=0.38%, 1000=18.95%
lat (msec) : 2=13.32%, 4=0.28%, 50=0.07%, 100=0.17%, 250=64.89%
lat (msec) : 500=1.58%, 750=0.29%
cpu : usr=0.38%, sys=0.58%, ctx=19973, majf=0, minf=24
IO depths : 1=0.1%, 2=0.1%, 4=0.1%, 8=0.1%, 16=0.1%, 32=0.1%, >=64=99.8%
submit : 0=0.0%, 4=100.0%, 8=0.0%, 16=0.0%, 32=0.0%, 64=0.0%, >=64=0.0%
complete : 0=0.0%, 4=100.0%, 8=0.0%, 16=0.0%, 32=0.0%, 64=0.1%, >=64=0.0%
issued : total=r=0/w=29643/d=0, short=r=0/w=0/d=0
Run status group 0 (all jobs):
WRITE: io=118572KB, aggrb=1969KB/s, minb=1969KB/s, maxb=1969KB/s, mint=60216msec, maxt=60216msec
--snip--
So, these numbers seem pretty much on-par with what we expected for this type of disk: 352 MB/s for sequential reads, 740 MB/s for sequential writes, 782 IOPS (4 KB) for random reads, and 347 IOPS (4 KB) for random writes. During these tests, background logical drive / disk initialization was still taking place, so our numbers may have been a bit better after this was complete. The sequential write and even the read throughput is quite nice... we’re guessing this is thanks to the controller’s on-board SSD volume (CacheCade) and/or the 1 GB of controller cache.
DRBD Configuration
Now, we move on to configuring DRBD. In our setup, we will have (2) DRBD resources (volumes) in dual-primary mode, with LVM running on top of each of these (an LVM volume group for each). For the DRBD syncer rate, we read the rule of thumb for the max rate is 30% of your slowest link (I/O subsystem, replication link); we settled on 75 MB to start with. First, we set our global/common DRBD configuration on each host; we modified the ‘/etc/drbd.d/global_common.conf’ file to look like this on both hosts:
# 20130410 MAS

global {
        usage-count no;
}

common {
        handlers {
                pri-on-incon-degr "/usr/lib/drbd/notify-pri-on-incon-degr.sh; /usr/lib/drbd/notify-emergency-reboot.sh; echo b > /proc/sysrq-trigger ; reboot -f";
                pri-lost-after-sb "/usr/lib/drbd/notify-pri-lost-after-sb.sh; /usr/lib/drbd/notify-emergency-reboot.sh; echo b > /proc/sysrq-trigger ; reboot -f";
                local-io-error "/usr/lib/drbd/notify-io-error.sh; /usr/lib/drbd/notify-emergency-shutdown.sh; echo o > /proc/sysrq-trigger ; halt -f";
                fence-peer "/usr/lib/drbd/crm-fence-peer.sh";
                split-brain "/usr/lib/drbd/notify-split-brain.sh root";
                out-of-sync "/usr/lib/drbd/notify-out-of-sync.sh root";
                after-resync-target "/usr/lib/drbd/crm-unfence-peer.sh";
        }
        startup {
                degr-wfc-timeout 120;
                outdated-wfc-timeout 2;
        }
        options {
                on-no-data-accessible io-error;
        }
        disk {
                on-io-error detach;
                disk-barrier no;
                disk-flushes no;
                fencing resource-only;
                al-extents 3389;
                c-plan-ahead 0;
                resync-rate 75M;
        }
        net {
                protocol C;
                after-sb-0pri discard-zero-changes;
                after-sb-1pri discard-secondary;
                after-sb-2pri disconnect;
                rr-conflict disconnect;
                max-buffers 8000;
                max-epoch-size 8000;
                sndbuf-size 512k;
        }
}
Next we created our DRBD resource configuration files; instead of using the generic “/dev/sdX” block device nodes for the storage backing, we used the unique SCSI disk identifiers populated in the "/dev/disk-by-id" directory. We created both of these files (exactly the same) on both ESOS storage server nodes.
/etc/drbd.d/r0.res:
# 20130410 MAS

resource r0 {
        net {
                allow-two-primaries;
        }
        on cantaloupe.mcc.edu {
                device     /dev/drbd0;
                disk       /dev/disk-by-id/LUN_NAA-600605b0054a753018f855fa236d6d41;
                address    192.168.50.21:7788;
                meta-disk  internal;
        }
        on raisin.mcc.edu {
                device    /dev/drbd0;
                disk      /dev/disk-by-id/LUN_NAA-600605b0054a751018f856b51625577a;
                address   192.168.50.22:7788;
                meta-disk internal;
        }
}
/etc/drbd.d/r1.res:
# 20130410 MAS

resource r1 {
        net {
                allow-two-primaries;
        }
        on cantaloupe.mcc.edu {
                device     /dev/drbd1;
                disk       /dev/disk-by-id/LUN_NAA-600605b0054a753018f8565a29255421;
                address    192.168.50.21:7789;
                meta-disk  internal;
        }
        on raisin.mcc.edu {
                device    /dev/drbd1;
                disk      /dev/disk-by-id/LUN_NAA-600605b0054a751018f856f319dfd5f7;
                address   192.168.50.22:7789;
                meta-disk internal;
        }
}
Now we are ready to setup the DRBD resources. On both nodes, run the following commands:
drbdadm create-md r0
drbdadm up r0
drbdadm create-md r1
drbdadm up r1
Now, on only one of the hosts (it doesn't really matter since this all fresh), run this:
drbdadm primary --force r0
drbdadm primary --force r1
The above commands make the DRBD resources primary on that host, and starts the full synchronization to the other host. On the non-primary host (“Secondary”) you can run the following to make the resources primary there:
drbdadm primary r0
drbdadm primary r1
LVM Configuration
Next, we need to get Logical Volume Manager (LVM) setup. For our configuration, we have (2) DRBD resources, and with this we will create (2) LVM physical volumes (PV), and (2) LVM volume groups (VG). We already setup our LVM device filter in the configuration file a few pages back, this way we don’t get complaints from LVM about finding duplicates, it will only match “/dev/drbdX” block devices. On just one of the hosts, we ran the following:
pvcreate /dev/drbd0
pvcreate /dev/drbd1
vgcreate -c y r0 /dev/drbd0
vgcreate -c y r1 /dev/drbd1
We can now check that our (2) new LVM volume groups are available (on both hosts):
vgdisplay
More Cluster Configuration
Now we are ready to finish configuring the cluster stack; we have our DRBD resources configured, and LVM volume groups setup. Lets start by disabling STONITH (we will enable it at the end):
crm configure property stonith-enabled="false"
We broke each chunk of the cluster configuration out into a separate step so we can explain each piece as we go in the article. The first chunk we added was for the DRBD resources:
crm
cib new drbd
configure primitive p_drbd_r0 ocf:linbit:drbd \
        params drbd_resource="r0" \
        op monitor interval="10" role="Master" \
        op monitor interval="20" role="Slave" \
        op start interval="0" timeout="240" \
        op stop interval="0" timeout="100"
configure primitive p_drbd_r1 ocf:linbit:drbd \
        params drbd_resource="r1" \
        op monitor interval="10" role="Master" \
        op monitor interval="20" role="Slave" \
        op start interval="0" timeout="240" \
        op stop interval="0" timeout="100"
configure group g_drbd p_drbd_r0 p_drbd_r1
configure ms ms_drbd g_drbd \
        meta master-max="2" master-node-max="1" \
        clone-max="2" clone-node-max="1" \
        notify="true" interleave="true"
cib commit drbd
quit
In the step above, we have two DRBD resources (r0, r1) that we configured previously, and we are setting two masters (two nodes, dual-primary mode). We used the advised/default resource agent parameters for ocf:linbit:drbd.
Next, we added the resource configuration for LVM2:
crm
cib new lvm
configure primitive p_lvm_r0 ocf:heartbeat:LVM \
        params volgrpname="r0" \
        op start interval="0" timeout="30" \
        op stop interval="0" timeout="30"
configure primitive p_lvm_r1 ocf:heartbeat:LVM \
        params volgrpname="r1" \
        op start interval="0" timeout="30" \
        op stop interval="0" timeout="30"
configure group g_lvm p_lvm_r0 p_lvm_r1
configure clone clone_lvm g_lvm \
        meta interleave="true" target-role="Started"
cib commit lvm
quit
For LVM, we have two DRBD resources (r0, r1) that we are running LVM on top of. As mentioned earlier, the clvmd service is used in conjunction with this type of setup. This setup could have been done other ways, but we felt it was simplest to use LVM on top of a couple large DRBD resources, instead of trying to setup a DRBD resource for each individual volume we wanted to share on our SAN. The cluster configuration for these resources was pretty straight forward, a primitive for each volume group (r0, r1) and then a clone statement so they are started on both of our nodes.
Next we added the SCST configuration. In this setup, only one of the two nodes will be a “Master” for the SCST resource (and one “Slave”). Again, this is used with the ALUA setup in SCST which is our extra state for the resource (SCST is always started/running, only ALUA information is updated). The parameters for this resource specify the SCST ALUA device group name, “local” target group name, and “remote” target group name. This sounds exactly like what it is... the local target group contains targets local to that node, and remote are the other node’s targets. We added the SCST ALUA device group and target groups earlier in the article.
crm
cib new scst
configure primitive p_scst ocf:esos:scst \
        params alua="true" device_group="esos" \
        local_tgt_grp="local" remote_tgt_grp="remote" \
        op monitor interval="10" role="Master" \
        op monitor interval="20" role="Slave" \
        op start interval="0" timeout="120" \
        op stop interval="0" timeout="60"
configure ms ms_scst p_scst \
        meta master-max="1" master-node-max="1" \
        clone-max="2" clone-node-max="1" \
        notify="true" interleave="true"
cib commit scst
quit
In the step above, the SCST RA is configured with only one master, and we don’t care which one it is since LVM and DRBD are both running active/active on the cluster.
Next, we added the order and colocation rules. At this point, resources have been trying to start, promote, etc. as we added them and some may have failed as we didn't add the constraints as we went, but in our case it didn't matter much since this is a new cluster, not existing, and we don’t have anything connected to it yet. Here are the constraints we used:
crm
cib new constraints
colocation c_r0_r1 inf: ms_scst:Started clone_lvm:Started ms_drbd:Master
order o_r0_r1 inf: ms_drbd:promote clone_lvm:start ms_scst:start
cib commit constraints
quit
Above you can see the colocation and order rules we added... we want DRBD to be promoted to master first, then LVM can start, and then SCST can start. This was the last main cluster configuration step.
When the cluster attempts to start the LVM resources, they will fail since at this point there were no logical volumes (LV) configured for the volume groups. So, we went ahead and created one on each:
lvcreate -L 4T -n big_vmfs_1 r0
lvcreate -L 4T -n big_vmfs_2 r1
We used the ‘crm resource cleanup’ command to fix all of the failed / timed out resources and everything started as expected:
--snip--
Last updated: Thu Apr 11 11:54:41 2013
Last change: Thu Apr 11 11:49:44 2013 via cibadmin on raisin.mcc.edu
Stack: corosync
Current DC: cantaloupe.mcc.edu (1) - partition with quorum
Version: 1.1.8-1f8858c
2 Nodes configured, unknown expected votes
10 Resources configured.
Online: [ cantaloupe.mcc.edu raisin.mcc.edu ]
Master/Slave Set: ms_scst [p_scst]
Masters: [ cantaloupe.mcc.edu ]
Slaves: [ raisin.mcc.edu ]
Clone Set: clone_lvm [g_lvm]
Started: [ cantaloupe.mcc.edu raisin.mcc.edu ]
Master/Slave Set: ms_drbd [g_drbd]
Masters: [ cantaloupe.mcc.edu raisin.mcc.edu ]
--snip--


Provisioning Storage
Now that the cluster is configured, we moved onto provisioning our storage. First we zoned all of our initiators with each target (on each switch). Then, using the TUI we created a host group (Hosts -> Add Group) for each server, and then added the server’s initiator to each group (Hosts -> Add Initiator). After zoning everything on our Fibre Channel switches, we used the ‘fcc.sh’ tool in the ESOS shell to get a list of the visible FC initiators. This made it very easy for copying/pasting the initiator names into the TUI.
Next we created a 50 GB boot volume for each of our (4) ESXi hosts; we used the CLI to do this (LVM logical volumes):
lvcreate -L 50G -n boot_mulberry r0
lvcreate -L 50G -n boot_lime r0
lvcreate -L 50G -n boot_banana r0
lvcreate -L 50G -n boot_keylime r0
Then, after we created the (4) ESXi boot volumes above, on each ESOS storage server, using the TUI, we added the SCST device for each (vdisk_blockio), and then mapped each device as LUN 0 to each corresponding host group (Devices -> Map to Group). For each SCST device we created using the vdisk_blockio mode, we made sure to set “Write Through” to Yes/1 and “NV Cache” to No/0 since we are using DRBD in dual-primary mode and would most definitely like to avoid data divergence!


For each SCST device we create, we need to run the following command on both hosts to add the device into our SCST implicit ALUA configuration:
scstadmin -add_dgrp_dev boot_mulberry -dev_group esos
scstadmin -add_dgrp_dev boot_lime -dev_group esos
scstadmin -add_dgrp_dev boot_banana -dev_group esos
scstadmin -add_dgrp_dev boot_keylime -dev_group esos
scstadmin -add_dgrp_dev big_vmfs_1 -dev_group esos
scstadmin -add_dgrp_dev big_vmfs_2 -dev_group esos
Final Cluster Setup
Now that our cluster is set up, some storage is provisioned, and everything is working, we can add fencing mechanisms into our configuration and re-enable STONITH:
crm
cib new stonith
configure primitive fence_cantaloupe stonith::fence_ipmilan \
params pcmk_host_list="cantaloupe.mcc.edu" ipaddr=”172.16.6.21” \
login=”user” passwd=”password” lanplus=”true” \
op monitor interval="60"
configure primitive fence_raisin stonith::fence_ipmilan \
params pcmk_host_list="raisin.mcc.edu" ipaddr=”172.16.6.22” \
login=”user” passwd=”password” lanplus=”true” \
op monitor interval="60"
cib commit stonith
quit
crm configure property stonith-enabled="true"
Finally, we tested our fencing mechanism (one at a time) on each node to ensure they work: crm node fence NODE_NAME
After we were sure everything was tested and working as it should be, we enabled a cluster-status-change email mechanism. The crm_mon utility supports an external agent; we used the ocf:pacemaker:ClusterMon resource agent and the crm_mon_email.sh script that ESOS includes, to send simple/basic emails regarding the cluster if anything changes. Not something you want enabled when testing as it sends an individual email for each cluster status change, so you can rack up a fair number of emails from something as simple as a node rebooting. We configured our ClusterMon RA like this:
crm
cib new clustermon
configure primitive p_notify ocf:pacemaker:ClusterMon \
params user="root" update="30" \
extra_options="-E /usr/local/bin/crm_mon_email.sh -e root" \
op monitor on-fail="restart" interval="10"
configure clone clone_notify p_notify \
meta target-role="Started"
cib commit clustermon
quit
There, thats it! Our ESOS disk array cluster is fully functional and tested. Here is our final cluster configuration (`crm configure show`), just for reference:
node $id="1" cantaloupe.mcc.edu
node $id="2" raisin.mcc.edu
primitive fence_cantaloupe stonith:fence_ipmilan \
        params pcmk_host_list="cantaloupe.mcc.edu" ipaddr="172.16.6.21" login="user" passwd="password" lanplus="true" \
        op monitor interval="60"
primitive fence_raisin stonith:fence_ipmilan \
        params pcmk_host_list="raisin.mcc.edu" ipaddr="172.16.6.22" login="user" passwd="password" lanplus="true" \
        op monitor interval="60"
primitive p_drbd_r0 ocf:linbit:drbd \
        params drbd_resource="r0" \
        op monitor interval="10" role="Master" \
        op monitor interval="20" role="Slave" \
        op start interval="0" timeout="240" \
        op stop interval="0" timeout="100"
primitive p_drbd_r1 ocf:linbit:drbd \
        params drbd_resource="r1" \
        op monitor interval="10" role="Master" \
        op monitor interval="20" role="Slave" \
        op start interval="0" timeout="240" \
        op stop interval="0" timeout="100"
primitive p_lvm_r0 ocf:heartbeat:LVM \
        params volgrpname="r0" \
        op start interval="0" timeout="30" \
        op stop interval="0" timeout="30"
primitive p_lvm_r1 ocf:heartbeat:LVM \
        params volgrpname="r1" \
        op start interval="0" timeout="30" \
        op stop interval="0" timeout="30"
primitive p_notify ocf:pacemaker:ClusterMon \
        params user="root" update="30" extra_options="-E /usr/local/bin/crm_mon_email.sh -e root" \
        op monitor on-fail="restart" interval="10"
primitive p_scst ocf:esos:scst \
        params alua="true" device_group="esos" local_tgt_grp="local" remote_tgt_grp="remote" \
        op monitor interval="10" role="Master" \
        op monitor interval="20" role="Slave" \
        op start interval="0" timeout="120" \
        op stop interval="0" timeout="60"
group g_drbd p_drbd_r0 p_drbd_r1
group g_lvm p_lvm_r0 p_lvm_r1
ms ms_drbd g_drbd \
        meta master-max="2" master-node-max="1" clone-max="2" clone-node-max="1" notify="true" interleave="true"
ms ms_scst p_scst \
        meta master-max="1" master-node-max="1" clone-max="2" clone-node-max="1" notify="true" interleave="true"
clone clone_lvm g_lvm \
        meta interleave="true" target-role="Started"
clone clone_notify p_notify \
        meta target-role="Started"
colocation c_r0_r1 inf: ms_scst:Started clone_lvm:Started ms_drbd:Master
order o_r0_r1 inf: ms_drbd:promote clone_lvm:start ms_scst:start
property $id="cib-bootstrap-options" \
        dc-version="1.1.8-1f8858c" \
        cluster-infrastructure="corosync" \
        stonith-enabled="true" \
        last-lrm-refresh="1365772801"
This disk array is currently only being used in a VMware vSphere (ESXi) environment. VMware ESXi supports implicit ALUA, and you can check the pathing in vSphere Client by going to the Configuration tab for a host, then click Storage, click Properties for a datastore, and finally click Manage Paths. We used the “Most Recently Used” path selection policy and checked that for each datastore, it selected the correct path for I/O. We also noticed when using ALUA with SCST in ESOS, that the storage array type now shows “VMW_SATP_ALUA”. For a non-ALUA SCST/ESOS configuration, it usually shows “VMW_SATP_DEFAULT_AA”.
One other thing we typically do with VMware ESXi initiators when using them with ESOS/SCST is disable support for vStorage APIs for Array Integration (VAAI). Its not currently supported on the disk arrays, and it just seems to pollute the logs since the VAAI SCSI commands fail (not supported). In vSphere Client, for each host, go to the Configuration tab, then Advanced Settings, and set the following to ‘0’:
- /VMFS3/HardwareAcceleratedLocking
- /DataMover/HardwareAcceleratedMove
- /DataMover/HardwareAcceleratedInit
This concludes my article on building and using a Fibre Channel disk array based on Enterprise Storage OS (ESOS). This unit has been in production for less than a week now, and I will follow-up to this article after some time with our experiences using the disk array. Please leave any comments/question; I hope others might find this useful!
Hi Marc,
ReplyDeleteThank you for this very work explained !
I myself use SCST in a simple manner till now, and am very interested in using an HA configuration with SCST.
Though, everything has to be done by hand, till ESOS is here.
I've got a question : when you wite that "and we only want the initiators to use a single path/target (unless there is a failover), since there is more to SCSI than just reading/writing blocks of data.", does it mean that you identified issues while trying to work with several targets active on each controller ?
I'd be very pleased to get your views on this.
Regards, and nice work again !
Hi,
DeleteI haven't personally experienced this, but other users have made it a point:
http://fghaas.wordpress.com/2011/11/29/dual-primary-drbd-iscsi-and-multipath-dont-do-that/
http://scst.svn.sourceforge.net/viewvc/scst/trunk/scst/README.drbd?revision=4563&view=markup
--Marc
Hi Marc,
DeleteThank you for your reply;
I carefully read the two links you pointed to me.
However, these cautions apply strictly speaking to dual primary configurations.
And with SCST, it seems clear to me that these configurations are a no go, unless one day SCST handles natively clustering, which would be great :)
But for active/passive configurations, which is the situation you describe in this design, It would be very interesting to be able to target for instance Host A via several FC paths.
All paths on Host A being preferred paths, and all paths on Host B being the non optimized ones.
On the initiator side, I think that only a single active policy would manage, but it would be perfectly ok from a functional point of view. In this configuration, the cluster would survive several double faults situations.
I'd be very interested by any tips you would have, and thank you again for this article, which gave me the opportunity to envision other possibilities of deployment with SCST.
Regards.
Hello Marc,
ReplyDeleteThank you for this detailed article. Your implementation is fully redundant in terms of each physical storage component.
I have been searching over the web in order to build a storage virtualizer like EMC VPLEX / IBM SVC. I think I can use your implementation with some modifications since I will not use local disks on nodes.
My plan is to use multiple HBAs on nodes from different Vendors in order to avoid conflicts within back-end storage ports and target ports. eg. I will have Emulex cards in order to access external storage devices and serve them using Qlogic cards.
In your setup you are using local disks on both nodes and replicating them over DRBD. In my setup I will present each back-end lun to each of nodes, so I will have the same physical disk on both nodes. (like a shared storage in clusters) Do you think that DRBD could manage this setup as well ?
I will start implementation this week and post you.
Regards.
Or instead of DRBD, Should I use a clusterfs like Redhat GFS or IBM GPFS ?
DeleteYou shouldn't have a problem using DRBD to replicate the back-end storage (even if its a LU via FC target as you described it).
DeleteI believe the setup described here is a bit over-kill and wasteful, but its the only way to do this (that I know of) currently. Soon there will be products like the LSI Logic Synchro CS controller: http://www.lsi.com/downloads/Public/Ha-das/docs/LSI_tb_HighAvailabilitySolutions.pdf
This will change things greatly since then we can have SAS back-end storage enclosures, dual controller heads (ESOS) and then connected to a iSCSI, FC, FCoE, or IB SAN, just like a typical commercial enterprise disk array.
Let me know how your solution turns out.
--Marc
Well, after digging more I found out that CLVM is doing it's job. No need to setup drbd for dual active controller. I will have shared luns from external storage, create concurrent VGs using these luns and create LVs on them. Each LV is going to be a vdisk for scst. This is a complete setup.
ReplyDeleteAs long as IO to my lun come from same initiator host and they end up with my lun, there will be no corruption theoretically. I will see in practice soon.
What you are doing is different than what i am trying to do. You build up a storage box, I build up a storage virtualizer. I don't deal with internal storage. I assume that one has the enough storage that he can not manage easily anymore and needs sth. like SVC or VPLEX.
Moreover, I will use DRBD to replicate SCST front end luns (LVs) to DR site. But first I need to be comfortable with DRBD. I am trying to figure out whether DRBD should be on top of LVM or vice versa.
For our setup, we decided on using LVM on top of DRBD since there are a number of steps to configuring DRBD resources vs. LVM PVs/VGs/LVs (comparatively). This way we configured larger underlying storage devices that are then replicated, then we used LVM on top of this to carve up individual volumes of varying sizes for the initiators.
Delete--Marc
Hi Marc. Have you considered using an SRP target between nodes and an MD1 device instead of DRBD? I think you'll get MUCH better performance.
ReplyDeleteI've been testing a two-node cluster using MD1 devices backed by SRP targets exported from each node. Its an active/active HA configuration. Right now, I'm stuck trying to wrap my mind around the best way to manage it though because there are alot of moving parts to this. You have the SRP target from the remote node. You have the MD device. You have CLVM, the SCST target based off the logical volume. The target ALUA states which need to be properly managed and controlled during failover.. (sigh).
Right now I'm just using crude scripts to manage it. I'm thinking I need a custom RA for pacemaker with some wrapper scripts to help out.
Hi,
DeleteNo, I haven't considered using SRP and software RAID (md) but probably something worth looking at. In our current setup, the bottleneck is going to be the local disk storage not the connection between the two systems, so I don't believe it would bring any more performance for us.
I believe DRBD will likely take advantage of RDMA in the future, which will probably be the ideal solution for performance and ease of management.
--Marc
I'm curious. What is your top sync speed right now using DRBD?
DeleteAgain, I'm using some old Voltaire hardware, but I'm able to get 1.2 - 1.4 GB total when syncing both mirrors and that is just with 2x RAID5 volumes consisting of 8 15K sas disks. A total of 2.4 GB which isn't bad at all.
I'm honestly not sure; the setup described above has been running in production since March of this year, so if I ever need to do a complete resync, I'll let ya know. =)
Delete--Marc
Also one other thing Marc. The LSI Syncro controllers now supposedly support Linux. They enable clustering using shared storage so this could be a more cost effective and scalable solution.
ReplyDeleteYou could use OCFS2 and fileio OR you could use CLVM. The cost of a kit is roughly 5K but seeing as you don't need to buy storage twice AND it reduces complexity (e.g. eliminates replication or mirroring) and is more scalable, its worth the money in my opinion.
Yes, I've already seen that and am quite excited to try it. =)
DeleteI got word that they would be announcing it at LinuxCon but I checked there web site the other week but didn't see the Linux drivers posted yet.
That is the real-deal solution there; 2 controller heads and all shared SAS back-end storage (no duplicating local storage). Then you can use DRBD to replicate to a DR site or something similar.
Hoping the LSI Syncro controllers will be a winter project; of course I will be sure ESOS works flawlessly with that setup and post another article. =)
--Marc
Looking forward to the article. I wrote LSI an email begging for an eval unit lol. I doubt ill get it, but it was worth a try :)
DeleteI'm also visiting this site regularly, this web site is really nice and the users are genuinely sharing good thoughts. Davie
ReplyDeleteHello,
ReplyDeleteI am also interested in the possibility of using the new LSI Syncro controllers to create a redundant SCST system. Has anyone tested with these controllers yet? I have been using SCST in the single head configuration for years, and Im excited to have the ability for a redundant system. I don't have any experience with CLVM, or clustering for that matter, so I am curious what all would be needed to make the LSI Syncro stuff work properly. Thanks in advance for any info. Also, thank you for ESOS, its a great product.
Sean
Hi Sean,
DeleteIts funny you mention that -- using the LSI Syncro CS controllers with Enterprise Storage OS (SCST) is my current project. I have the controllers in Dell PE R420's with a QLogic FC HBA and LSI 9286-8e in each box. They're connected to a DataON DNS-1600D JBOD with a mix of SSDs and 15K SAS disks. So far, so good. I've already begun writing an article for this blog, but I haven't completed testing/tweaking yet.
I expect to post the article in the next few weeks -- keep an eye out!
--Marc
I am looking forward to the post. There are a few things that I am curious about with the Syncro hardware and a SCST target, such as configuring LVM, ALUA, etc. Also, I see the Syncos come with Read cachecade, is it possible to add to this read cache with Enhance-IO on top of it? Thanks and hope to see the blog post soon!
DeleteSean
Okay, so it was delayed by almost 5 months, but here it is: http://marcitland.blogspot.com/2014/07/open-storage-dual-controller-oss-disk.html
DeleteI Never ever found such edifying blogs. TORI
ReplyDeleteI didn't think cachecade was an SSD or flash on the card, but once licensed you can add your own enterprise grade SSD's as cache attached to the controller, none of the numbers seem to indicate any flash caching
ReplyDeletePen Drives are offered in new and advanced looks in addition to features with more emerging technologies. You can find more details on Origineel sinterklaascadeaus. 500 soorten leuke usb sticks.
ReplyDeletehello i try to create my cluster . but i can not continue
ReplyDeletecrm(live)# configure show
node 1: storage1.xtc.com
node 2: storage2.xtc.com
primitive p_drbd_r0 ocf:linbit:drbd \
params drbd_resource=r0 \
op monitor interval=10 role=Master \
op monitor interval=20 role=Slave \
op start interval=0 timeout=240 \
op stop interval=0 timeout=100
primitive p_lvm_r0 LVM \
params volgrpname=r0 \
op start interval=0 timeout=30 \
op stop interval=0 timeout=30 \
meta target-role=Started
primitive p_scst ocf:esos:scst \
params alua=true device_group=esos local_tgt_grp=local remote_tgt_grp=remote \
op monitor interval=10 role=Master \
op monitor interval=20 role=Slave \
op start interval=0 timeout=120 \
op stop interval=0 timeout=60
group g_drbd p_drbd_r0
group g_lvm p_lvm_r0
ms ms_drbd g_drbd \
meta master-max=2 master-node-max=1 clone-max=2 clone-node-max=1 notify=true interleave=true
ms ms_scst p_scst \
meta master-max=1 master-node-max=1 clone-max=2 clone-node-max=1 notify=true interleave=true
clone clone_lvm g_lvm \
meta interleave=true target-role=Started
colocation c_r0_r1 inf: ms_scst:Started clone_lvm:Started ms_drbd:Master
order o_r0_r1 inf: ms_drbd:promote clone_lvm:start ms_scst:start
property cib-bootstrap-options: \
have-watchdog=false \
dc-version=1.1.16-94ff4df \
cluster-infrastructure=corosync \
cluster-name=esos \
stonith-enabled=false \
last-lrm-refresh=1570628241
crm(live)# status
Stack: corosync
Current DC: storage1.xtc.com (version 1.1.16-94ff4df) - partition with quorum
Last updated: Wed Oct 9 14:37:17 2019
Last change: Wed Oct 9 14:23:55 2019 by root via crm_shadow on storage1.xtc.com
2 nodes configured
6 resources configured
Online: [ storage1.xtc.com storage2.xtc.com ]
Full list of resources:
Master/Slave Set: ms_drbd [g_drbd]
Masters: [ storage1.xtc.com storage2.xtc.com ]
Clone Set: clone_lvm [g_lvm]
Started: [ storage1.xtc.com storage2.xtc.com ]
Master/Slave Set: ms_scst [p_scst]
p_scst (ocf::esos:scst): FAILED storage1.xtc.com (blocked)
p_scst (ocf::esos:scst): FAILED storage2.xtc.com (blocked)
Failed Actions:
* p_scst_stop_0 on storage1.xtc.com 'not configured' (6): call=19, status=complete, exitreason='none',
last-rc-change='Wed Oct 9 14:28:45 2019', queued=0ms, exec=32ms
* p_scst_stop_0 on storage2.xtc.com 'not configured' (6): call=19, status=complete, exitreason='none',
last-rc-change='Wed Oct 9 14:32:17 2019', queued=0ms, exec=32ms
Fantastic work! Thank you for sharing such useful and interesting information. Please continue publishing helpful topics like this. Regards, Web Design Brisbane, SEO, and digital marketing. Thank you very much!
ReplyDeleteThis is a wonderful article, and I really enjoy reading it. Thanks for sharing with us. Please check our Car Removal Adelaide and Cash for Cars Adelaide. Thank you!
ReplyDeleteWe provide the best Cash for Car Edinburgh North at A1 Car Removal. We provide same-day scrap and unwanted car removal services around Adelaide. We give a faster response time for any make or condition of old car removal. We have a fleet of tow trucks completely equipped with suitable tools and equipment to lift and load all weights and sizes, whether you want to sell your vehicle or a sedan, SUV, or light truck. For further information, call 0451 214 280.
ReplyDelete